反对《阿里巴巴Android开发手册》中NestedScrollView嵌套RecyclerView的用法

转载 :作者:移不动丶

链接:

https://juejin.im/post/5d75e8cd6fb9a06afd662bf3

本文由作者授权发布。

个人始终觉得《阿里巴巴Android开发手册》是一本好手册,上面确实提供了很多Android开发的开发者注意不到的地方,个人也从中获益匪浅,这片文章也只是针对其中的一点谈了一些自己不一样的理解

#问题背景

在开发中我们经常会遇到需要ScrollView嵌套RecyclerView的情况,例如美团商家首页这样式的:

忽略其细节的交互,美团外卖商家首页大致可以抽象成两部分:

  • 顶部的商家介绍(我们姑且称之为Header)
  • 底部的商品列表(我们姑且称之为Content)

如果对Android开发规范不太了解,布局大概会这样实现:

1
2
3
4
5
6
7
8
9
10
11
12
13
14
15
16
17
18
19
20
21
22
23
24
<ScrollView xmlns:android="http://schemas.android.com/apk/res/android"
xmlns:tools="http://schemas.android.com/tools"
android:layout_width="match_parent"
android:layout_height="match_parent">
<LinearLayout
android:layout_width="match_parent"
android:layout_height="wrap_content"
android:orientation="vertical">
<TextView
android:padding="15dp"
android:layout_width="match_parent"
android:layout_height="200dp"
android:background="@color/colorAccent"
android:gravity="center"
android:text="我是商家介绍,我们家的饭贼好吃,优惠还贼多,买到就是赚到"
android:textColor="#fff"
android:textSize="20dp" />
<android.support.v7.widget.RecyclerView
android:id="@+id/recyclerView"
android:layout_width="match_parent"
android:layout_height="wrap_content"
android:background="@color/design_default_color_primary"/>
</LinearLayout>
</ScrollView>

#2问题出现

上面的布局看起来好像没什么毛病,我们运行一下看看效果:

看到上图我相信大部分的内心是崩溃的:为什么Header不会跟随着Content一起滑动呢?说好的滚动视图ScrollView,为什么你就不“滚”了呢?

Header为什么不能滚动了

很简单,我们先来看看官方对于ScrollView是怎么定义的:

1
2
3
4
5
6
7
/**
* A view group that allows the view hierarchy placed within it to be scrolled.
* 一个允许内部视图层次滚动的视图组。
* Scroll view may have only one direct child placed within it.
* ScrollView 仅可包含一个直接子View
* ...此处省略不相关的注释...
*/

从注释我们能明显看出来,官方对于ScrollView最言简意赅的定位就是可以使其内部布局滚动的布局。

我们再接着看一下RecyclerView的定位:

1
2
3
4
/**
* A flexible view for providing a limited window into a large data set.
* 一种灵活的视图,用于在有限的窗口展示大量的数据。
*/

在有限的窗口展示大量的数据,说白了,就是以滚动的方式,使用有限的空间展示大量的数据(这里的“有限”很重要,我们下面会用到)。

那么问题就来了:两个视图都能滚动,当我们的手指在屏幕上滑动的时候,Android系统并不知道我们想要哪个视图滚动起来,这就是我们常说的滑动冲突。

除此之外,ScrollView嵌套ListView时,会疯狂调用Adapter中的getView()方法,将ListView所有的item加载到内存中,消耗大量的内存和cpu资源,引起界面卡顿。

这也就是为什么《阿里巴巴Android开发手册》中禁止ScrollView嵌套ListView/GridView/ExpandableListView。

image-20190920101353276

滑动冲突的解决

现在解决滑动冲突的方案主要有两个,其一:基于传统的事件分发机制;其二:使用NestedScrollingChild & NestedScrollingParent。

第一种方案网上相关教程有很多,这里就不再赘述。关于NestedScrollingChild与NestedScrollingParent的用法推荐学习鸿洋大大的博客:

Android NestedScrolling机制完全解析 带你玩转嵌套滑动

https://blog.csdn.net/lmj623565791/article/details/52204039

由于传统事件分发机制的缺陷(父布局拦截消费滑动事件后无法继续传递给子View),所以我们这里更推荐第二种方式解决滑动冲突。

当然,如果只是为了解决这里遇到的问题,我们大可不必从头研究NestedScrollingParent与NestedScrollingChild的用法,因为Android内置的许多控件已经实现了这两个接口,这其中就包括了我们接下来要提到的NestedScrollView.作为日常开发中的高频控件,RecyclerView当然也实现了这一机制。

#3换上NestedScrollView试试?

对于NestedScrollView,官方的定义是这样的:

  • 1
    2
    3
    4
    5
    6
    7
    8
    /**
    * NestedScrollView is just like {@link android.widget.ScrollView},
    * NestedScrollView与ScrollView类似
    * but it supports acting as both a nested scrolling parent and child on both new and old versions of Android.
    * 但它支持在Android的新旧版本上同时充当嵌套滚动的父视图和子视图。
    * Nested scrolling is enabled by default.
    * 默认情况下启用嵌套滚动。
    */

看起来NestedScrollView似乎能够完美解决我们遇到的困扰,那我们不妨把上面的根布局换成NestedScrollView试一下:

1
2
3
4
5
6
7
8
9
10
11
12
13
14
15
16
17
18
19
20
21
22
23
24
<android.support.v4.widget.NestedScrollView
xmlns:android="http://schemas.android.com/apk/res/android" xmlns:tools="http://schemas.android.com/tools"
android:layout_width="match_parent"
android:layout_height="match_parent">
<LinearLayout
android:layout_width="match_parent"
android:layout_height="wrap_content"
android:orientation="vertical">
<TextView
android:padding="15dp"
android:layout_width="match_parent"
android:layout_height="200dp"
android:background="@color/colorAccent"
android:gravity="center"
android:text="我是商家介绍,我们家的饭贼好吃,优惠还贼多,买到就是赚到"
android:textColor="#fff"
android:textSize="20dp" />
<android.support.v7.widget.RecyclerView
android:id="@+id/recyclerView"
android:layout_width="match_parent"
android:layout_height="wrap_content"
android:background="@color/design_default_color_primary"/>
</LinearLayout>
</android.support.v4.widget.NestedScrollView>

运行起来看下效果:

换成NestedScrollView后,交互看起来符合我们的预期了

鼓掌👏撒花🎉,看起来我们成功解决了问题。真的是这样么?

#4新问题出现了

我们都知道,RecyclerView 是需要结合 Adapter来使用的,Adapter中有几个关键方法:

  • onViewAttachedToWindow
  • onCreateViewHolder
  • onBindViewHolder …

其中,关于onViewAttachedToWindow方法的调用,源码中是这么说明的:

1
2
3
4
/**
* Called when a view created by this adapter has been attached to a window.
* 当Adapter通过onCreateViewHolder方法创建的视图被附加到窗口时调用。
*/

也就是说,当RecyclerView中的视图滚动到屏幕我们可以看到的时候,就会调用该方法。我们复写该方法,打印出Log,看下NestedScrollView嵌套下的RecyclerView的onViewAttachedToWindow()方法的调用情况:

1
2
3
4
5
6
7
override fun onViewAttachedToWindow(holder: ViewHolder) {
super.onViewAttachedToWindow(holder)
Log.e(TAG, "onViewAttachedToWindow:" +holder.tvPosition.text.toString())
}
override fun getItemCount(): Int {
return 50
}

调用情况如下:

1
2
3
4
5
6
7
8
2019-09-06 17:59:02.161 24351-24351/com.vision.advancedui E/MyAdapter: onViewAttachedToWindow:Position:0
2019-09-06 17:59:02.165 24351-24351/com.vision.advancedui E/MyAdapter: onViewAttachedToWindow:Position:1
2019-09-06 17:59:02.168 24351-24351/com.vision.advancedui E/MyAdapter: onViewAttachedToWindow:Position:2
2019-09-06 17:59:02.171 24351-24351/com.vision.advancedui E/MyAdapter: onViewAttachedToWindow:Position:3
......
此处省略45条相似log
......
2019-09-06 17:59:02.304 24351-24351/com.vision.advancedui E/MyAdapter: onViewAttachedToWindow:Position:49

通过日志,我们可以清晰的看到,RecyclerView 几乎一瞬间加载完了所有的(这里为50个)item,和Google官方描述的“按需加载”完全不同,是Google注释描述的不对么?

image-20190920101704174

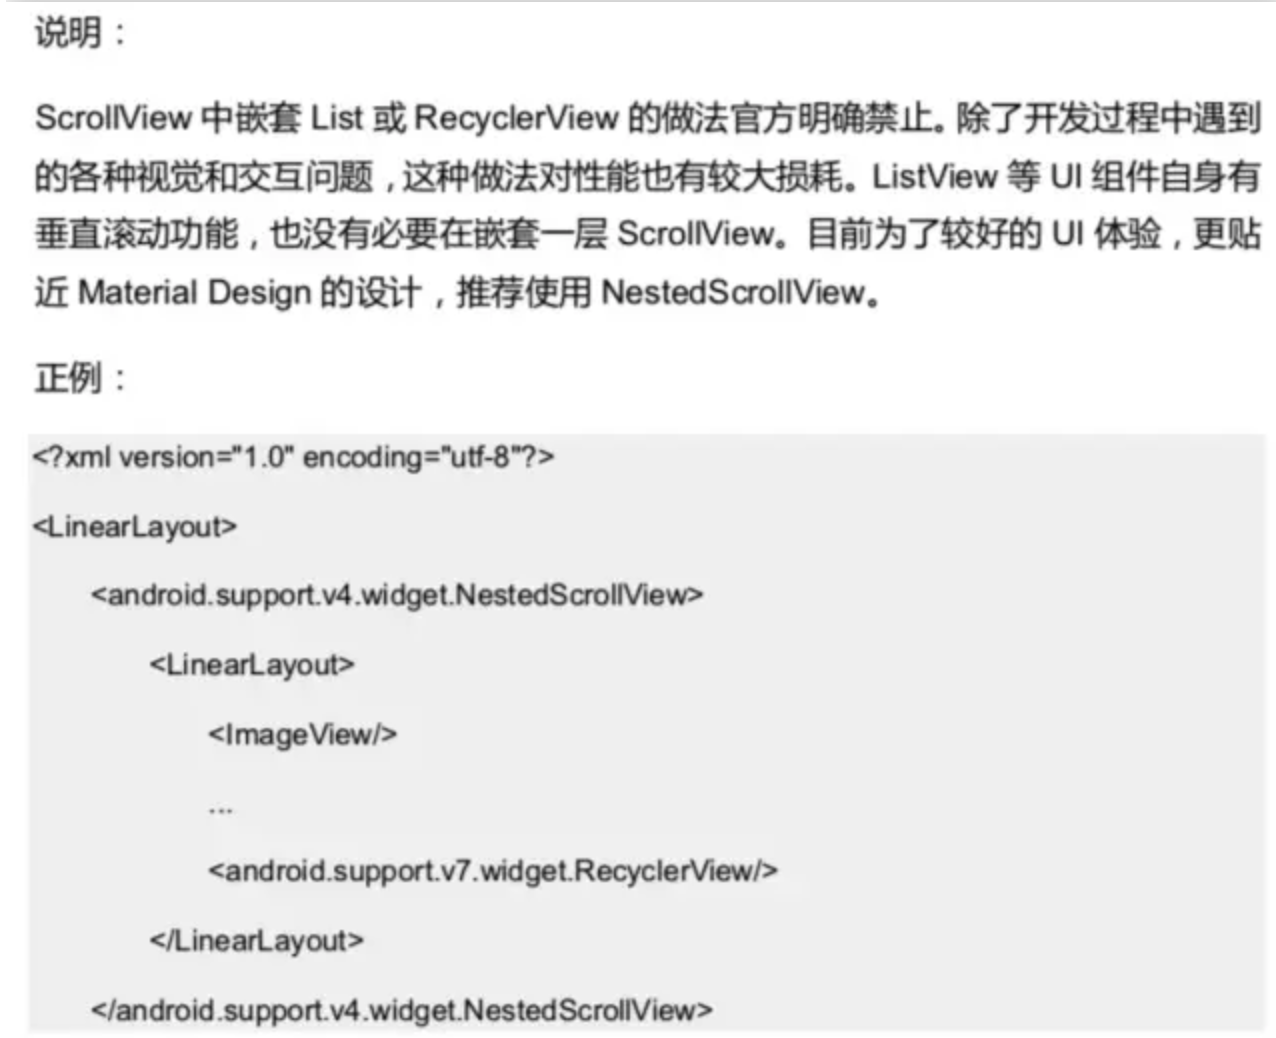
包括《阿里巴巴Android开发规范》里,也有这样的用法示例,并标注为了“正确“用法。究竟是哪里出了问题呢?

#5找到问题的根本

我们上文提到了,Google对于RecyclerView的定位是:在有限的窗口展示大量的数据,我们很容易想到,会不会是RecyclerView的高度测量出错了?

View的绘制流程

相信大部分人都知道Android大体的绘制流程(把大象装冰箱,总共分几步?):

  1. measure
  2. layout
  3. draw

映射到我们平常自定义View中的方法就是onMeasure、onLayout、onDraw三个方法,对于继承自ViewGroup的视图,除了要确定自身的大小外,还要帮助子View测量,确定他们的大小,对此,ViewGroup提供了一个静态方法getChildMeasureSpec:

1
2
3
4
5
6
7
8
9
10
11
12
13
14
15
16
17
18
19
20
21
22
23
24
25
26
27
28
29
30
31
32
33
34
35
36
37
38
39
40
41
42
43
44
45
46
47
48
49
50
51
52
53
54
55
56
57
58
59
60
61
62
63
64
65
66
67
68
public static int getChildMeasureSpec(int spec, int padding, int childDimension) {
int specMode = MeasureSpec.getMode(spec);
int specSize = MeasureSpec.getSize(spec);

int size = Math.max(0, specSize - padding);

int resultSize = 0;
int resultMode = 0;

switch (specMode) {
// Parent has imposed an exact size on us
case MeasureSpec.EXACTLY:
if (childDimension >= 0) {
resultSize = childDimension;
resultMode = MeasureSpec.EXACTLY;
} else if (childDimension == LayoutParams.MATCH_PARENT) {
// Child wants to be our size. So be it.
resultSize = size;
resultMode = MeasureSpec.EXACTLY;
} else if (childDimension == LayoutParams.WRAP_CONTENT) {
// Child wants to determine its own size. It can't be
// bigger than us.
resultSize = size;
resultMode = MeasureSpec.AT_MOST;
}
break;

// Parent has imposed a maximum size on us
case MeasureSpec.AT_MOST:
if (childDimension >= 0) {
// Child wants a specific size... so be it
resultSize = childDimension;
resultMode = MeasureSpec.EXACTLY;
} else if (childDimension == LayoutParams.MATCH_PARENT) {
// Child wants to be our size, but our size is not fixed.
// Constrain child to not be bigger than us.
resultSize = size;
resultMode = MeasureSpec.AT_MOST;
} else if (childDimension == LayoutParams.WRAP_CONTENT) {
// Child wants to determine its own size. It can't be
// bigger than us.
resultSize = size;
resultMode = MeasureSpec.AT_MOST;
}
break;

// Parent asked to see how big we want to be
case MeasureSpec.UNSPECIFIED:
if (childDimension >= 0) {
// Child wants a specific size... let him have it
resultSize = childDimension;
resultMode = MeasureSpec.EXACTLY;
} else if (childDimension == LayoutParams.MATCH_PARENT) {
// Child wants to be our size... find out how big it should
// be
resultSize = View.sUseZeroUnspecifiedMeasureSpec ? 0 : size;
resultMode = MeasureSpec.UNSPECIFIED;
} else if (childDimension == LayoutParams.WRAP_CONTENT) {
// Child wants to determine its own size.... find out how
// big it should be
resultSize = View.sUseZeroUnspecifiedMeasureSpec ? 0 : size;
resultMode = MeasureSpec.UNSPECIFIED;
}
break;
}
//noinspection ResourceType
return MeasureSpec.makeMeasureSpec(resultSize, resultMode);
}

该方法返回一个MeasureSpec,关于MeasureSpce,翻译成中文即为测量规格,它是一个32位的int类型,高2位代表测量模式,低30位代表测量大小。网上关于它的介绍有很多,这里就不展开讲了。我们这里只要知道,测量模式有3种:

  • UNSPECIFIED 未指明模式父布局不限制子布局的大小,对其不做任何限制。
  • EXACTLY 精确模式父布局可以确定子布局的最终大小。
  • AT_MOST 至多模式父布局确定不了子布局的最终大小,但是子布局的大小不能超过父布局给出的大小。

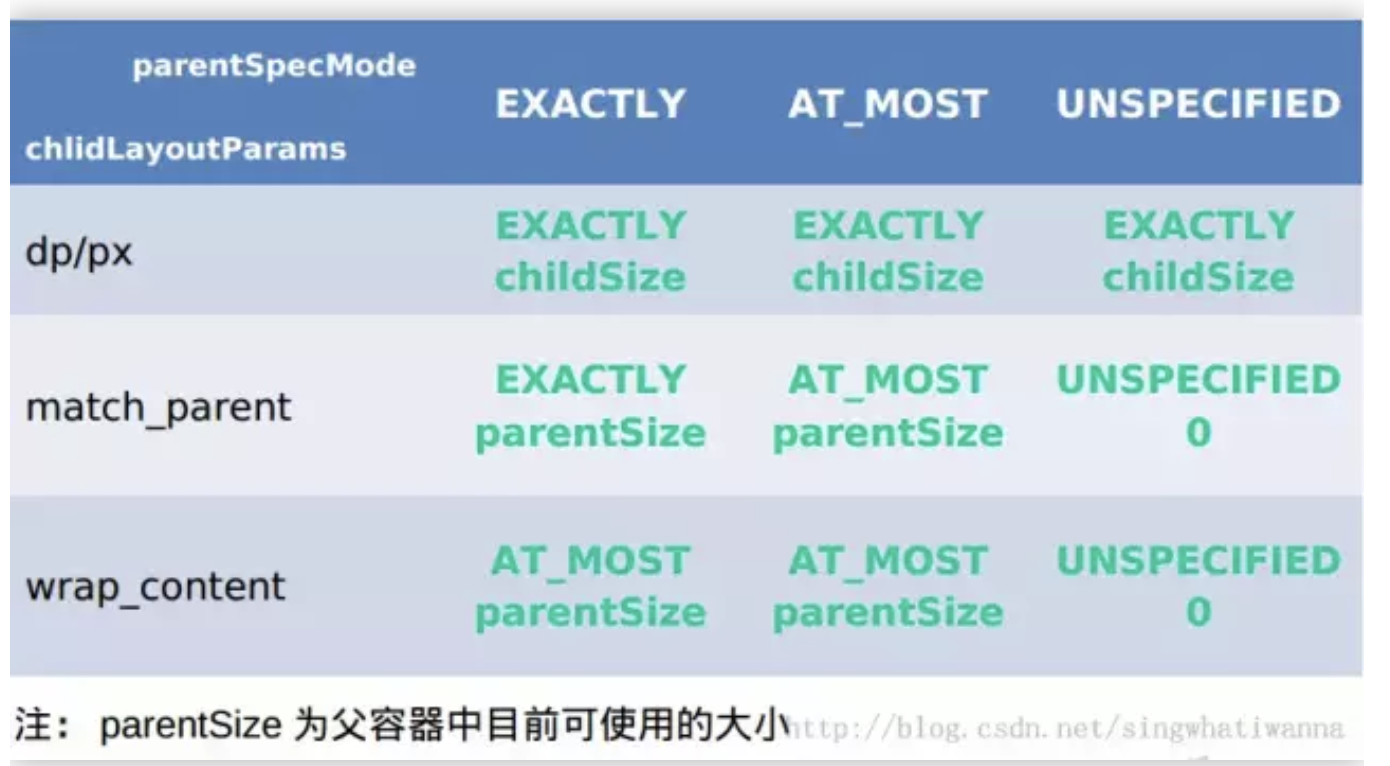
总结成表格就是这样的(借用任玉刚大佬的图):

image-20190920101816035

1
2
3
4
protected void onMeasure(int widthMeasureSpec, int heightMeasureSpec) {
setMeasuredDimension(getDefaultSize(getSuggestedMinimumWidth(), widthMeasureSpec),
getDefaultSize(getSuggestedMinimumHeight(), heightMeasureSpec));
}

我们可以认为,调用setMeasuredDimension方法就标志着子View完成了测量,其高度和宽度也就随之确定了下来。通过不断的递归循环这个流程就能完成最终的测量。

RecyclerView的测量出现问题了么?

回到我们这个问题,通过以上View测量流程的回顾,我们可以确定:

RecyclerView的高度是由NestedScrollView中传递给RecyclerView中的MeasureSpec参数和RecyclerView中的onMeasure两处决定的我们先来看看NestedScrollView中传递给RecyclerView中的MeasureSpec参数,在NestedScrollView的measureChild方法中是这么写的:

1
2
3
4
5
6
7
8
9
10
11
12
13
14
protected void measureChild(View child, int parentWidthMeasureSpec,
int parentHeightMeasureSpec) {
ViewGroup.LayoutParams lp = child.getLayoutParams();

int childWidthMeasureSpec;
int childHeightMeasureSpec;

childWidthMeasureSpec = getChildMeasureSpec(parentWidthMeasureSpec, getPaddingLeft()
+ getPaddingRight(), lp.width);

childHeightMeasureSpec = MeasureSpec.makeMeasureSpec(0, MeasureSpec.UNSPECIFIED);

child.measure(childWidthMeasureSpec, childHeightMeasureSpec);
}

我们可以看到,传递给RecyclerView关于高度的测量模式是UNSPECIFIED。接下来看看RecyclerView中的onMeasure():

1
2
3
4
5
6
7
8
9
10
11
12
13
14
15
16
17
18
19
20
21
22
23
24
25
26
27
28
29
30
31
32
33
34
35
36
37
38
39
40
41
42
43
44
45
46
47
48
49
50
51
52
53
54
55
56
57
58
59
60
61
62
63
64
65
66
67
68
69
70
71
protected void onMeasure(int widthSpec, int heightSpec) {
if (mLayout == null) {
defaultOnMeasure(widthSpec, heightSpec);
return;
}
if (mLayout.mAutoMeasure) {
final int widthMode = MeasureSpec.getMode(widthSpec);
final int heightMode = MeasureSpec.getMode(heightSpec);
final boolean skipMeasure = widthMode == MeasureSpec.EXACTLY
&& heightMode == MeasureSpec.EXACTLY;
mLayout.onMeasure(mRecycler, mState, widthSpec, heightSpec);
if (skipMeasure || mAdapter == null) {
return;
}
if (mState.mLayoutStep == State.STEP_START) {
dispatchLayoutStep1();
}
// set dimensions in 2nd step. Pre-layout should happen with old dimensions for
// consistency
mLayout.setMeasureSpecs(widthSpec, heightSpec);
mState.mIsMeasuring = true;
dispatchLayoutStep2();
// now we can get the width and height from the children.
// 这行代码是重点
mLayout.setMeasuredDimensionFromChildren(widthSpec, heightSpec);

// if RecyclerView has non-exact width and height and if there is at least one child
// which also has non-exact width & height, we have to re-measure.
if (mLayout.shouldMeasureTwice()) {
mLayout.setMeasureSpecs(
MeasureSpec.makeMeasureSpec(getMeasuredWidth(), MeasureSpec.EXACTLY),
MeasureSpec.makeMeasureSpec(getMeasuredHeight(), MeasureSpec.EXACTLY));
mState.mIsMeasuring = true;
dispatchLayoutStep2();
// now we can get the width and height from the children.
mLayout.setMeasuredDimensionFromChildren(widthSpec, heightSpec);
}
} else {
if (mHasFixedSize) {
mLayout.onMeasure(mRecycler, mState, widthSpec, heightSpec);
return;
}
// custom onMeasure
if (mAdapterUpdateDuringMeasure) {
eatRequestLayout();
onEnterLayoutOrScroll();
processAdapterUpdatesAndSetAnimationFlags();
onExitLayoutOrScroll();

if (mState.mRunPredictiveAnimations) {
mState.mInPreLayout = true;
} else {
// consume remaining updates to provide a consistent state with the layout pass.
mAdapterHelper.consumeUpdatesInOnePass();
mState.mInPreLayout = false;
}
mAdapterUpdateDuringMeasure = false;
resumeRequestLayout(false);
}

if (mAdapter != null) {
mState.mItemCount = mAdapter.getItemCount();
} else {
mState.mItemCount = 0;
}
eatRequestLayout();
mLayout.onMeasure(mRecycler, mState, widthSpec, heightSpec);
resumeRequestLayout(false);
mState.mInPreLayout = false; // clear
}
}

这块代码的逻辑还是很清晰的,在mAutoMeasure属性为true时,除了RecyclerView没有精确的宽度和高度 + 至少有一个孩子也有不精确的宽度和高度的时候需要测量两次的时候,高度的测量模式为EXACTLY,其余都是调用mLayout.setMeasuredDimensionFromChildren(widthSpec, heightSpec)来确定RecyclerView的大小。

关于mAutoMeasure属性什么时候为true,源码里的注释是这么说的:

英语就不贴了,这里用大白话翻译一下,中心意思就是:**如果搭配RecyclerView的LayoutManager支持WRAP_CONTENT的属性时,这个值就应该为true。

看到这里我相信你们又该有疑问了:

都有哪些LayoutManager支持WRAP_CONTENT属性呢?源码注释是这么说的:

1
2
3
4
5
6
/**
* AutoMeasure works as follows:
* <ol>
* <li>LayoutManager should call {@code setAutoMeasureEnabled(true)} to enable it. All of
* the framework LayoutManagers use {@code auto-measure}.</li>
*/

意思就是所用Android提供的原生的LayoutManager的mAutoMeasure属性都为true。

我们再来看下setMeasuredDimensionFromChildren方法。

1
2
3
4
5
6
7
8
9
10
11
12
13
14
15
16
17
18
19
20
21
22
23
24
25
26
27
28
29
30
31
32
33
void setMeasuredDimensionFromChildren(int widthSpec, int heightSpec) {
final int count = getChildCount();
if (count == 0) {
mRecyclerView.defaultOnMeasure(widthSpec, heightSpec);
return;
}
int minX = Integer.MAX_VALUE;
int minY = Integer.MAX_VALUE;
int maxX = Integer.MIN_VALUE;
int maxY = Integer.MIN_VALUE;

for (int i = 0; i < count; i++) {
View child = getChildAt(i);
final Rect bounds = mRecyclerView.mTempRect;
getDecoratedBoundsWithMargins(child, bounds);
if (bounds.left < minX) {
minX = bounds.left;
}
if (bounds.right > maxX) {
maxX = bounds.right;
}
if (bounds.top < minY) {
minY = bounds.top;
}
if (bounds.bottom > maxY) {
maxY = bounds.bottom;
}
}
// 遍历RecyclerView的所有子View,将其left、top、right、bottom四个值赋值给mTempRect
mRecyclerView.mTempRect.set(minX, minY, maxX, maxY);
// 真正确定RecyclerView高度的代码
setMeasuredDimension(mRecyclerView.mTempRect, widthSpec, heightSpec);
}

看来最后还是要看下setMeasuredDimension方法:

1
2
3
4
5
6
7
8
9
10
public void setMeasuredDimension(Rect childrenBounds, int wSpec, int hSpec) {
int usedWidth = childrenBounds.width() + getPaddingLeft() + getPaddingRight();
// 子View的高度:padding + height
int usedHeight = childrenBounds.height() + getPaddingTop() + getPaddingBottom();
int width = chooseSize(wSpec, usedWidth, getMinimumWidth());
// 看起来chooseSize方法是关键了
int height = chooseSize(hSpec, usedHeight, getMinimumHeight());
// 调用该方法即标志着测量的结束
setMeasuredDimension(width, height);
}

最终,我们定位到:RecyclerView高度的确定重点依靠chooseSize方法,我们来看看:

1
2
3
4
5
6
7
8
9
10
11
12
13
14
public static int chooseSize(int spec, int desired, int min) {
final int mode = View.MeasureSpec.getMode(spec);
final int size = View.MeasureSpec.getSize(spec);
switch (mode) {
case View.MeasureSpec.EXACTLY:
return size;
case View.MeasureSpec.AT_MOST:
return Math.min(size, Math.max(desired, min));
case View.MeasureSpec.UNSPECIFIED:
default:
// 这里的desired便是setMeasuredDimension中的子View的高度
return Math.max(desired, min);
}
}

这里我们又发现了熟悉的老朋友MeasureSpec,并且这里我们看到了测量模式为UNSPECIFIED的情况下RecyclerView的处理:返回了RecyclerView中子View的高度与最小值两者之间的最大值。

这也就是我们上面介绍的UNSPECIFIED的意义:不对布局大小做限制,即你想要多大就多大。最终RecyclerView的高度就是所有子View的高度了。

问题找到了

通过上面的探索,我相信在坐的各位应该很清楚问题的原因了:

NestedScrollView传递给子View的测量模式为UNSPECIFIED,RecyclerView在UNSPECIFIED的测量模式下,会不限制自身的高度,即RecyclerView的窗口高度将会变成所有item高度累加后加上paddding的高度。因此,表现出来就是item一次性全部加载完成。

这样做在RecyclerView的item数量较少的时候可能没什么问题,但是如果item数量比较多,随之带来的性能问题就会很严重。

所以这里我斗胆发出不一样的声音:禁止使用NestedScrollView嵌套RecyclerView。

6这种布局该怎么实现

推荐使用RecyclerView的多样式布局实现,毕竟RecyclerView自带滑动,没必要外层套一个ScrollerView或者NestedScrollView。或者使用CoordinatorLayout布局,玩出更多花样~

写在最后

这篇文章发出来之前,我的内心也是充满忐忑的,毕竟开始接触Android的时候,我也是觉得《阿里巴巴Android开发手册》是不可能错的。没想到文章的反响会这么大,针对评论里提的比较多的话题这里做一个统一的回复:

Q: RecyclerView的高度不使用WRAP_CONTENT而是使用特定的值(比如200dp)是不是就没有这个问题了?

A:答案是肯定的,通过任玉刚大佬总结的表我们也可以知道:只有当Parent的测量模式为UNSPECIFIED、子View的layoutparams中的高度设定为WRAP_CONTENT或者MATCH_PARENT时,子View的测量模式才为UNSPECIFIED。

Q: 《阿里巴巴Android开发手册》中并不是倡导大家使用NestedScrollView嵌套RecyclerView,而是提倡大家使用NestedScrollView嵌套RecyclerView的方案替换ScrollView嵌套RecyclerView的方案。

A:不排除这种情况,可是NestedScrollView嵌套RecyclerView确实会有问题,除了对性能的影响外,如果项目中在onAttachViewToWindow中有其他操作(比如曝光)就会影响该操作的准确程度了,这点《阿里巴巴Android开发手册》没有提到,这篇文章的初衷也只是让大家对NestedScrollView嵌套RecyclerView的缺点有一个具体的认知,而且,我个人对于不分情况的使用NestedScrollView嵌套RecyclerView并不认同。

Q: RecyclerView的数据量小的时候,可以使用NestedScrollView嵌套RecyclerView么?

A:RecyclerView数量可控的情况下,使用NestedScrollView嵌套RecyclerView可能确实不会有性能上的问题,如果在Adapter中没有对onAttachViewToWindow方法做任何扩展,也确实没有其他的影响。

但是站在个人立场下我还是不推荐这么做:RecyclerView本身支持滑动,没有必要在外层嵌套NestedScrollView,NestedScrollView嵌套RecyclerView的方案除了开发的时候节省了些许时间外其他没有一点好处。

当然,写这篇文章也不是就要求大家一定按照这样的方式去实现,毕竟别人说的再好,不一定适合你的项目。

最后,个人始终觉得《阿里巴巴Android开发手册》是一本好手册,上面确实提供了很多Android开发的开发者注意不到的地方,个人也从中获益匪浅,这片文章也只是针对其中的一点谈了一些自己不一样的理解,毕竟开源平台“百家争鸣”。

最后的最后,谢谢你们喜欢我的文章,不胜感激。

坚持原创技术分享,您的支持将鼓励我继续创作!
nbwzlyd 微信支付

微信支付

nbwzlyd 支付宝

支付宝